How to Clean a Toaster Inside
You might not realize that neglecting to clean a toaster inside can reduce its efficiency and even pose a fire risk. Cleaning a toaster inside is essential to maintain optimal performance and safety.
To do this properly, start by unplugging the unit to avoid any electrical hazards. Next, remove any loose crumbs that have accumulated at the bottom.
Carefully address the heating elements without using liquids to prevent damage. Understanding each step will ensure your toaster stays in good condition longer and operates safely.
Key Takeaways
- Always unplug the toaster and let it cool completely before cleaning to ensure safety.
- Remove and empty the crumb tray, then wipe it clean before reinserting.
- Shake out loose crumbs by tilting the toaster sideways and upside down over a trash bin.
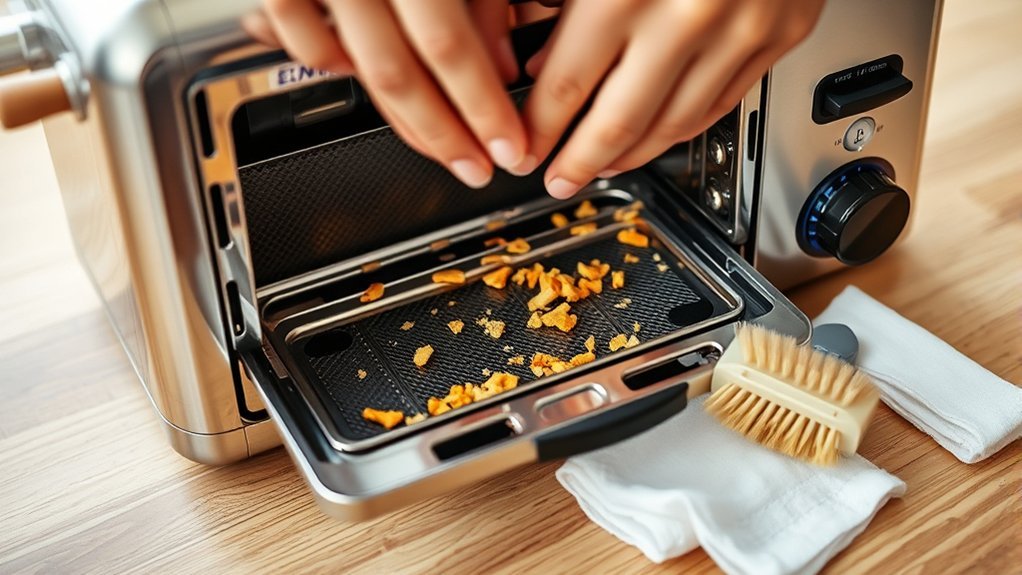
- Use a soft-bristle brush or compressed air to gently clean crumbs from slots and heating elements.
- Avoid liquids inside slots. For burnt stains, apply baking soda paste, let sit, then wipe with a damp cloth.
Why You Should Clean Your Toaster Regularly
Regularly cleaning your toaster prevents the buildup of crumbs and debris that can cause overheating or even fires. To guarantee toaster safety, you must remove trapped particles from the crumb tray and interior slots frequently.
Accumulated crumbs can ignite when exposed to the heating elements, posing a serious fire hazard. Additionally, residue impairs toaster performance, leading to uneven toasting or mechanical malfunction.
Incorporating toaster cleaning into your routine kitchen maintenance prolongs the appliance’s lifespan and maintains hygiene. Use a soft brush or cloth to clear loose crumbs without damaging components.
Always unplug the toaster before cleaning to eliminate electrical risks. By prioritizing this simple yet essential task, you uphold safety standards and guarantee efficient, reliable operation every time you use your toaster.
Tools Needed to Clean Inside Your Toaster
To effectively clean the inside of your toaster, you’ll need a few essential tools designed to reach tight spaces and remove crumbs without damaging components. Start with a soft-bristle brush or a small, clean paintbrush to dislodge crumbs from narrow slots.
A handheld vacuum with a nozzle attachment helps suction out loosened debris efficiently. Use a microfiber cloth slightly dampened with water or a mild cleaning solution to wipe accessible surfaces, avoiding excessive moisture.
Avoid metal utensils that could damage heating elements. Always have your cleaning supplies organized and ready for use. Adhering to safety tips, ensure all tools are dry and non-conductive to prevent electrical hazards.
These tools, combined with proper technique, will maintain your toaster’s functionality and hygiene effectively.
How to Unplug and Prepare Your Toaster Safely
Before you begin cleaning, always unplug your toaster to eliminate any risk of electrical shock. Unplug safety is paramount. Never attempt to clean while it’s connected.
Next, prepare your workspace by clearing the area around the toaster. This ensures no debris or liquids interfere with the process.
Use the following checklist to prepare your toaster safely:
| Step | Action | Reason |
|---|---|---|
| 1 | Unplug toaster from outlet | Prevent electrical shock |
| 2 | Allow toaster to cool down | Avoid burns |
| 3 | Clear surface around toaster | Prevent contamination |
| 4 | Gather cleaning tools nearby | Streamline cleaning process |
Following these steps guarantees a safe start to your cleaning task.
How to Shake Out Loose Crumbs Carefully
How should you remove loose crumbs from your toaster without causing damage? Start by positioning your toaster over a trash bin or sink to ensure crumbs containment and facilitate safe disposal. Then, follow these steps carefully:
- Hold the toaster firmly with both hands to maintain control and prevent accidental drops.
- Gently tilt and shake the toaster sideways and upside down, allowing loose crumbs to dislodge without forcing or banging.
- Inspect the bottom for residual crumbs and repeat the gentle shaking if necessary, avoiding any sharp impacts that could damage internal components.
Removing and Emptying the Crumb Tray
First, locate the crumb tray, which is usually found at the bottom or side of your toaster and slides out easily. Grip the tray firmly and pull it out completely to avoid spilling crumbs.
Empty the crumbs into a trash bin, then wipe the tray clean before reinserting it.
Locating The Crumb Tray
Where can you find the crumb tray in your toaster? Typically, it’s located at the bottom or side, designed to catch crumbs and prevent buildup. Identifying its exact position helps avoid common crumb tray pitfalls and dispels toaster maintenance myths, such as thinking crumbs are harmless or that trays are fixed.
To locate the crumb tray:
- Examine the toaster’s base or back for a thin, pull-out panel or sliding tray.
- Look for a small tab or handle; this mechanism often indicates the tray’s presence.
- Consult your toaster’s manual if the tray isn’t immediately visible. Some models integrate trays internally.
Knowing the crumb tray’s location allows you to remove and empty it regularly, ensuring efficient toaster function and safety.
Proper Disposal Methods
When should you remove the crumb tray to maintain your toaster’s performance and safety? Ideally, you should empty the crumb tray after every use or at least once a week to prevent buildup that can cause fire hazards.
To properly dispose of crumbs, follow disposal ethics by discarding them in biodegradable waste. For the tray itself, check local recycling options, as many trays are metal or plastic and recyclable.
| Step | Action | Notes |
|---|---|---|
| 1 | Unplug toaster | Ensure safety before removal |
| 2 | Locate crumb tray | Usually at the bottom |
| 3 | Slide out tray carefully | Avoid spilling crumbs |
| 4 | Empty crumbs in compost/bin | Follow disposal ethics |
| 5 | Clean tray and replace | Use mild detergent if needed |
Cleaning the Toaster Slots and Heating Elements
Cleaning the toaster slots and heating elements requires careful attention to avoid damaging delicate components. Use crumb fire safe methods to prevent hazards when removing debris. Follow these steps precisely:
- Unplug the toaster and let it cool completely to avoid electric shock or burns.
- Gently shake out loose crumbs over a trash bin; for edge cases with stubborn crumbs, use a soft brush or compressed air to dislodge particles without touching the heating wires.
- Avoid using liquids or abrasive tools inside the slots; instead, wipe accessible surfaces with a dry microfiber cloth to maintain element integrity.
Deep Cleaning Burnt Stains and Residue Inside
How do you effectively remove burnt stains and residue inside your toaster without causing damage? Start by unplugging the toaster and allowing it to cool completely. Use a soft brush or a wooden skewer to gently dislodge loose crumbs and burnt residue.
For stubborn stains, apply a paste made from baking soda and water to the affected areas. Let it sit for 10 minutes to break down the burnt residue. Then, use a damp cloth or sponge to wipe away the paste and loosened debris carefully.
Avoid abrasive tools or harsh chemicals that can scratch or damage the internal components. Repeat this process if necessary until all stubborn stains are removed. This method ensures a thorough deep clean without compromising your toaster’s integrity.
Drying and Reassembling Your Toaster After Cleaning
Why is thorough drying essential before reassembling your toaster? Moisture trapped inside can cause electrical faults or corrosion, compromising safety and toaster aesthetics. To ensure proper function and maintain your toaster’s clean appearance, follow these steps:
- Allow all components, especially crumb trays and interior surfaces, to air dry completely for at least 2 hours. Use a lint-free cloth to expedite drying without leaving fibers.
- Inspect for any residual moisture in hard-to-reach areas. Use compressed air or a dry brush to ensure crumb disposal pathways are completely dry.
- Reassemble carefully, ensuring all parts fit securely without forcing. Verify crumb trays slide smoothly and external panels align to preserve toaster aesthetics.
Drying thoroughly prevents damage and maintains optimal performance after cleaning.
How Often Should You Clean Your Toaster?
When should you perform maintenance on your toaster to guarantee optimal performance and hygiene? You should clean your toaster’s interior every 1 to 3 months, depending on usage frequency. Regular cleaning prevents crumb buildup that can cause smoke or fire hazards.
Clean your toaster every 1 to 3 months to prevent crumb buildup and ensure safe, efficient performance.
If you use your toaster daily, schedule cleaning monthly. For occasional use, quarterly maintenance suffices. Always unplug the toaster before cleaning to avoid electrical hazards.
Check your toaster warranty considerations, as some manufacturers require routine cleaning for warranty validity. After removing crumbs, consider recycling coffee grounds to deodorize the toaster interior naturally.
This eco-friendly method absorbs odors without damaging components. Maintaining a consistent cleaning routine extends your toaster’s lifespan and keeps it functioning safely and efficiently.
Frequently Asked Questions
Can I Use Vinegar to Clean My Toaster Inside?
You shouldn’t use vinegar inside your toaster. It’s a common toaster cleaning myth.
Instead, stick to safe cleaning methods like unplugging, removing crumbs, and wiping with a damp cloth to avoid damaging electrical components.
Is It Safe to Put a Toaster in the Dishwasher?
You shouldn’t put your toaster in the dishwasher for toaster safety. Dishwashers can damage electrical components.
Instead, use appropriate cleaning tools like brushes and cloths to clean it safely and effectively.
How Do I Prevent Mold Inside My Toaster?
You prevent mold inside your toaster by ensuring thorough drying after each use, promoting prevention through drying.
Regularly unplug and air it out, as mold deterrence relies on minimizing moisture buildup and maintaining a dry internal environment.
Can I Use a Vacuum Cleaner to Clean Toaster Crumbs?
You can use a vacuum cleaner to remove toaster crumb hazards, but avoid vintage models due to vacuum safety concerns like sparks or damage.
Opt for a handheld vacuum with a brush attachment to clean crumbs precisely and safely.
What Should I Do if My Toaster Sparks While Cleaning?
If your toaster sparks while cleaning, immediately unplug it and stop using it. Follow safety precautions by inspecting for damage or debris causing the spark. Consult a professional technician before resuming use to prevent electrical hazards.
Conclusion
By regularly cleaning your toaster, you keep it humming like a well-oiled machine, free from crumb buildup that can burn and smoke. Unplug it, shake out debris like dust from a rug, and scrub gently with a soft brush, avoiding moisture inside.
Empty the crumb tray and wipe surfaces dry to maintain peak performance. Treat your toaster with care, and it’ll reward you with perfectly toasted slices every time—clean, efficient, and ready to serve.
Remember, cleaning a toaster inside is essential for safety and optimal toasting results.