How to Clean Inside of a Toaster
Imagine you’ve just pulled a burnt toast slice from your toaster, only to notice crumbs stuck inside that could cause a fire hazard. Knowing how to clean inside of a toaster properly isn’t just about appearance—it’s essential for safety and performance.
You’ll need to follow specific steps to avoid damaging delicate components like heating elements while ensuring all debris is removed. Understanding these techniques will help you maintain your toaster effectively.
Key Takeaways
- Always unplug the toaster and ensure it is completely powered off before cleaning inside.
- Remove and empty the crumb tray, wash with warm soapy water, dry thoroughly, then reinsert.
- Hold the toaster upside down and gently shake to dislodge crumbs from interior slots.
- Use a soft brush or compressed air to clean inside slots and heating elements without moisture.
- Avoid using metal utensils or spraying liquids inside to prevent damage and electrical hazards.
Why Regular Toaster Cleaning Matters
Why should you clean your toaster regularly? Regular cleaning prevents crumbs and debris buildup, reducing fire hazards and ensuring toaster safety. From a cleaning science perspective, accumulated particles can overheat and ignite, posing risks to your kitchen.
Regular toaster cleaning prevents crumb buildup, reducing fire risks and ensuring kitchen safety.
You need to maintain optimal heat distribution by removing residue, which improves toasting performance and extends the appliance’s lifespan. Neglecting cleaning leads to corrosion and malfunction, compromising electrical components.
By adopting a routine cleaning schedule, you minimize contamination and prevent unpleasant odors caused by burnt crumbs. Pay close attention to areas inside the toaster where crumbs settle, as these are hotspots for potential hazards.
Prioritizing toaster safety through consistent cleaning will ensure your appliance operates efficiently without risking damage or injury.
Tools You Need to Clean Your Toaster
To clean your toaster effectively, you’ll need a few essential tools like a soft brush, a microfiber cloth, and a small vacuum or compressed air canister. Use safe cleaning materials such as mild detergent and water to avoid damaging the toaster’s components.
Optional accessories like a toothpick or cotton swabs can help you reach tight spots for a thorough clean.
Essential Cleaning Tools
A few specific tools will make cleaning the inside of your toaster efficient and thorough. Start with a soft-bristle brush or a small paintbrush to dislodge crumbs trapped in toaster shadows, those hard-to-see areas beneath the heating elements.
Use a handheld vacuum with a narrow nozzle attachment to extract loosened debris, respecting crumb etiquette by preventing crumbs from scattering. A microfiber cloth will help you wipe down accessible surfaces inside the toaster without damaging sensitive parts.
Additionally, a pair of tweezers can remove stubborn crumbs lodged in tight spots. Avoid using metal objects that risk damaging the toaster’s interior. Having these essential tools at hand ensures a precise, thorough cleaning that maintains your toaster’s performance and safety.
Safe Cleaning Materials
Selecting safe cleaning materials is essential for protecting your toaster’s delicate components while effectively removing residue and crumbs. Use a soft-bristled brush or a microfiber cloth to avoid scratching the heating elements and interior surfaces.
Avoid abrasive pads or harsh chemicals that can damage the toaster’s finish or leave harmful residues. Choose mild, food-safe detergents diluted in water for spot cleaning stubborn spots.
Ensure any cloth or brush you use is thoroughly rinsed and dried to prevent moisture buildup, which can cause electrical hazards. To minimize allergen exposure, especially if you have food sensitivities, use new or well-sanitized cleaning tools.
Always unplug your toaster before cleaning and avoid spraying liquids directly inside. These safe cleaning practices will maintain your toaster’s performance and longevity effectively.
Optional Accessories Benefits
Maintaining your toaster’s cleanliness becomes more efficient when you use the right tools designed for the task. Optional accessories, such as specialized crumb trays, soft-bristle brushes, and compressed air cans, offer targeted cleaning capabilities that basic methods lack.
The benefits of toaster accessories include enhanced debris removal from hard-to-reach slots, preventing buildup that affects performance and safety. For example, a crumb tray collects dislodged particles, simplifying cleanup without disassembling the toaster.
Brushes allow precise scrubbing without damaging heating elements. Compressed air removes fine dust and crumbs efficiently. By incorporating these optional accessories, you ensure thorough maintenance, extend your toaster’s lifespan, and reduce fire risks.
Using appropriate tools tailored to toaster cleaning helps you maintain optimal functionality with minimal effort and maximum safety.
How to Prep Your Toaster for Cleaning
First, unplug your toaster completely to ensure safety during cleaning. Next, remove the crumb tray carefully and set it aside.
Finally, gather all necessary cleaning supplies before proceeding.
Unplug Toaster Completely
Before you begin cleaning the inside of your toaster, make sure you unplug it completely from the power outlet. This step is essential to eliminate any risk of electric shock or accidental activation.
Locate the plug firmly and pull it out, avoiding yanking the cord. Once unplugged, position the toaster at a safety distance from any water sources or conductive surfaces. This precaution prevents any electrical hazards while you clean.
Confirm the toaster is fully powered down by inspecting that no indicator lights remain on. By unplugging your toaster and maintaining an appropriate safety distance, you create a secure environment for internal cleaning.
Never attempt to clean the toaster while plugged in, as it poses serious safety risks.
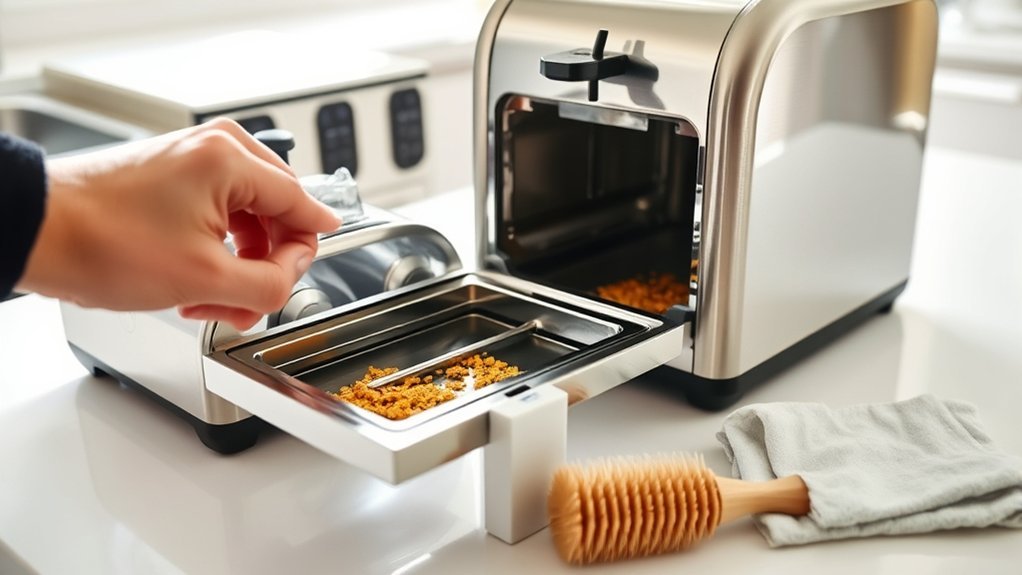
Remove Crumb Tray
After unplugging your toaster and ensuring it’s completely powered down, focus on removing the crumb tray to prepare for internal cleaning. The toaster crumb tray collects debris and crumbs, so handling it carefully is essential. Follow these steps:
Locate the crumb tray, usually at the bottom or side of the toaster. Gently slide the tray out without forcing to avoid damage. Inspect the tray for accumulated crumbs and residue.
Empty the crumbs into a trash bin using safe disposal methods to prevent fire hazards. Wipe the tray with a damp cloth if necessary, then dry thoroughly before reinserting.
Removing the toaster crumb tray correctly ensures you access the interior safely and maintain appliance hygiene effectively.
Gather Cleaning Supplies
How do you guarantee a thorough and safe cleaning of your toaster? First, gather cleaning supplies essential for effective toaster maintenance. You’ll need a soft-bristle brush or an unused toothbrush to dislodge crumbs from hard-to-reach areas.
Prepare a microfiber cloth slightly dampened with warm water and mild dish soap to wipe the exterior and crumb tray. Avoid abrasive materials that may damage the toaster’s surface. Also, have a small vacuum or handheld blower ready to remove loose debris safely.
Unplug the toaster before starting to prevent electrical hazards. By assembling these tools in advance, you ensure an organized, efficient cleaning process that prolongs your toaster’s lifespan and performance.
Proper preparation is the foundation of precise, safe toaster maintenance.
How to Remove Crumbs and Debris Safely
Where should you start when removing crumbs and debris from inside your toaster? Begin by unplugging the toaster to avoid electrical hazards. Proper crumb disposal prevents toasting mistakes caused by accumulated debris.
Follow these steps:
- Hold the toaster upside down over a trash bin.
- Gently shake to dislodge loose crumbs.
- Use a soft brush to reach stubborn debris inside slots.
- Avoid metal utensils to prevent damage or short circuits.
- Clean the crumb tray separately if your model includes one.
How to Clean the Heating Elements Without Damage
Since the heating elements are delicate and essential for your toaster’s function, you’ll need to clean them with care to avoid damage. Begin by unplugging the toaster and allowing it to cool completely. Use a soft-bristle brush or compressed air to gently dislodge crumbs and dust from the heating elements, avoiding direct contact with your fingers.
Avoid using water or liquid cleaners, as moisture can damage the elements and cause electrical hazards. Employ two word discussion ideas such as “gentle brushing” and “dry cleaning” to remember the best practices. Inspect the elements closely for any residue buildup and repeat brushing if necessary.
How to Clean the Tray and Exterior Surfaces
When was the last time you thoroughly cleaned your toaster’s tray and exterior surfaces? Proper toaster cosmetic care not only improves appearance but also extends appliance life. Follow these steps:
Unplug the toaster and remove the crumb tray carefully. Empty the tray and wash it with warm, soapy water; dry completely before reinserting.
Always unplug your toaster before removing and cleaning the crumb tray with warm, soapy water.
Wipe the exterior with a damp cloth to remove dust and debris. Use a mild non-abrasive cleaner for stubborn stains, avoiding moisture entry into slots.
Apply a small amount of stainless steel or appliance polish for exterior polishing, buffing to a consistent shine.
Regular maintenance ensures your toaster looks pristine and functions optimally. Avoid harsh chemicals to preserve the finish and prevent damage during cleaning.
Common Toaster Cleaning Mistakes to Avoid
Although cleaning your toaster seems straightforward, making certain mistakes can damage the appliance or reduce its efficiency. Avoid immersing your toaster in water; moisture can short-circuit electrical components, compromising toaster maintenance. Never insert sharp objects inside to dislodge crumbs, as this risks puncturing heating elements or internal wiring. Skipping the unplugging step before cleaning poses safety hazards and can lead to electric shock.
Also, don’t neglect regular crumb tray removal. Accumulated debris increases fire risk and undermines kitchen hygiene. Avoid harsh chemical cleaners; use mild detergents or baking soda solutions instead to prevent damaging the toaster’s finish or internal parts. Finally, ensure the toaster is completely dry before plugging it back in to maintain peak performance. Following these guidelines preserves your appliance’s lifespan and supports effective kitchen hygiene.
How Often to Clean Your Toaster for Best Results
How often should you clean your toaster to maintain optimal performance and safety? Regular toaster maintenance is essential for kitchen safety and ensuring your appliance functions properly. Follow this schedule to keep your toaster in top shape:
- Empty crumb tray weekly to prevent buildup.
- Wipe exterior surfaces monthly to remove grease and dust.
- Deep clean inside every 3 months to eliminate hidden debris.
- Inspect heating elements during each cleaning to spot damage.
- Avoid neglecting cleaning after spills to reduce fire hazards.
Adhering to this routine minimizes fire risks and prolongs your toaster’s lifespan. By staying consistent with your cleaning intervals, you maintain both efficiency and safety. Remember, proper toaster maintenance isn’t just about cleanliness; it’s a critical step in protecting your kitchen environment.
Frequently Asked Questions
Can I Use Vinegar to Clean the Inside of My Toaster?
You can use vinegar for toaster safety by dampening a cloth with it to clean removable parts. Avoid pouring vinegar inside; proper cleaning requires unplugging and removing crumbs to prevent damage and electrical hazards.
Is It Safe to Put My Toaster Parts in the Dishwasher?
Don’t throw the baby out with the bathwater. Most toaster parts aren’t dishwasher safe. Check your manual; metal trays might be okay, but electrical components must be hand-washed to avoid damage and ensure dishwasher safety.
How Do I Remove Burnt Smell From My Toaster?
To remove burnt aroma from your toaster, unplug it and wipe the interior with a vinegar-water solution. Leave the door open to air out the toaster. Then place a bowl of baking soda inside overnight for effective odor removal.
Can Cleaning Void My Toaster’s Warranty?
Like Pandora’s box, improper cleaning risks voiding your warranty. To avoid warranty implications, always follow manufacturer guidelines precisely.
Use recommended tools and avoid moisture near electrical components to ensure safe cleaning without jeopardizing your toaster’s coverage.
What Should I Do if My Toaster Sparks During Use?
If your toaster sparks during use, unplug it immediately and inspect for debris or metal objects inside. For cleaning safety, avoid using water; use a brush or compressed air to remove crumbs carefully before testing it again.
Conclusion
You might think cleaning your toaster is a crumb-sized task—too small to matter. Yet ignoring those crumbs risks burnt smells and even fire hazards.
By unplugging, removing trays, and using soft brushes as instructed, you prevent damage and keep your toaster efficient.
So don’t let tiny crumbs control your appliance’s fate. A little effort, done right and regularly, keeps your toaster safe and performing perfectly—because even small particles deserve big attention when it comes to how to clean inside of a toaster.