How to Make Cheese Sandwich in Toaster
If you’ve ever thought about making a cheese sandwich in a toaster, you’re in for a simple yet surprisingly tasty treat.
Making a cheese sandwich in a toaster requires picking the right bread and cheese, and handling the assembly carefully to avoid a melty mess.
It’s all about timing and technique, and with a few smart tips, you can get that perfect golden crust and gooey center.
But there’s a trick to getting it just right—let’s explore what that is.
Key Takeaways
- Choose sturdy bread slices, spread butter evenly outside, and pile inside with your preferred cheese like sharp cheddar or creamy mozzarella.
- Use a toaster with wide slots, adjustable browning, and removable crumb trays for easy cleaning and safety.
- Set toaster to medium heat to melt cheese gently without burning the bread, and monitor the sandwich closely during toasting.
- Remove the hot sandwich carefully with tongs or a spatula, unplug the toaster before handling stuck sandwiches, and never use metal utensils.
- Check for a golden-brown crust and bubbly cheese, serve immediately, and store leftovers in foil or an airtight container.
How to Prepare Bread and Cheese for Your Cheese Sandwich
Wondering how to get your bread and cheese ready for a perfect toaster cheese sandwich? First, choose bread pairs that complement your cheese. Think sturdy sourdough or classic white for melty goodness. Avoid super-thin slices; thicker bread holds the cheese better without turning soggy.
Next up, mastering buttering techniques is your secret weapon. Spread a thin, even layer of butter on the outside of each bread slice to achieve that golden, crispy crust. Don’t just slap it on—gently warming the butter makes it easier to spread smoothly.
Inside, pile up your favorite cheese: sharp cheddar, creamy mozzarella, or even a mix for extra flavor. Preparing your bread and cheese with care sets the stage for a sandwich that’s crispy, gooey, and downright irresistible.
Getting Your Toaster Ready for a Cheese Sandwich
Before you pop your cheese sandwich into the toaster, make sure you’ve got the right one for the job. Wide slots and adjustable settings work best.
You’ll want to set the toaster to a medium heat so the cheese melts without burning the bread. Getting these details right will make all the difference in your perfect cheesy toast!
Choosing The Right Toaster
A good toaster can make all the difference when crafting a perfect cheese sandwich. Choosing the right one ensures your sandwich melts evenly without burning or causing toaster safety issues. You want a toaster that’s up for the task, especially when dealing with gooey cheese selection that can drip or stick.
Here’s what to look for:
- Wide slots to fit thick bread and cheese without squishing
- Removable crumb trays for easy cleaning and safety
- Adjustable browning control so you get that perfect golden crust
- Cool-touch exterior to avoid burns while handling
Picking a toaster with these features helps you avoid mishaps and enjoy a melty, delicious cheese sandwich every time. Safety and convenience go hand in hand, so choose wisely!
Preparing Toaster Settings
How do you get your toaster set just right for a cheese sandwich? First, consider your bread selection. Thicker slices toast differently than thin ones, so adjust the setting accordingly.
If you’re using a denser bread, dial down the heat slightly to avoid burning the crust before the cheese melts. Next, make sure your toaster is clean and free of crumbs to prevent any flare-ups.
Always keep toaster safety in mind: never leave it unattended, especially when melting cheese, which can drip and cause smoke. Set the toaster to a medium setting, then watch closely the first time you try it.
This way, you’ll find the perfect balance of crisp bread and gooey cheese without risking a kitchen mishap.
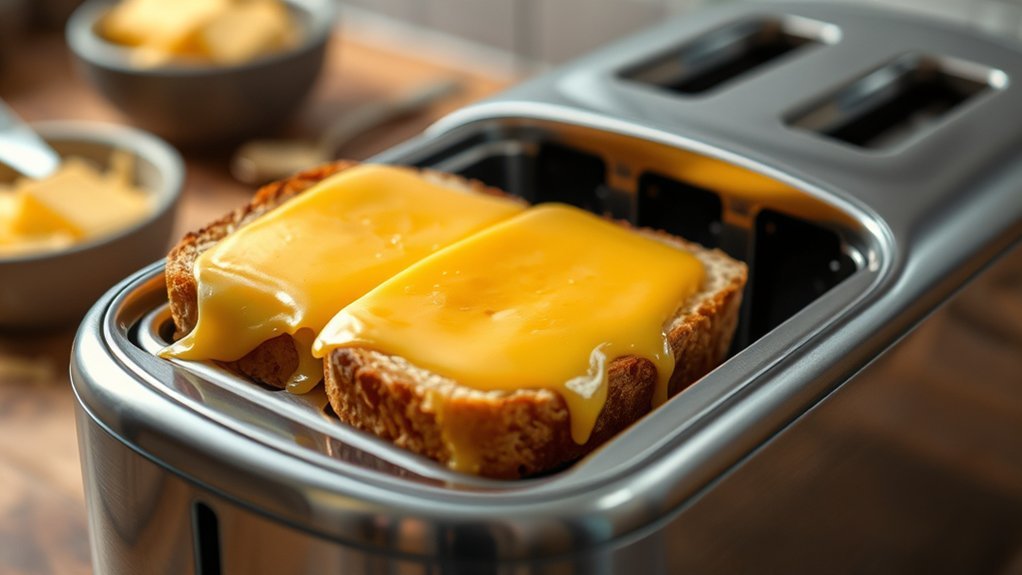
Toasting a Cheese Sandwich Step-by-Step
Wondering how to get that perfect golden crunch on your cheese sandwich? Start by placing your assembled sandwich carefully in the toaster or toaster oven, ensuring it fits without forcing it. Follow these steps for toasting success:
Get the perfect golden crunch by carefully placing your cheese sandwich in the toaster or toaster oven.
- Set the toaster to medium heat to avoid burning.
- Keep an eye on toaster safety; never leave it unattended.
- Once done, use tongs or a spatula to remove the hot sandwich.
- Don’t forget crumb cleanup to prevent fire hazards and keep your toaster fresh.
How to Tell When Your Cheese Sandwich Is Done
When can you be sure your cheese sandwich has reached that perfect, melty stage? Look for a golden-brown crust with cheese bubbling just at the edges. This means it’s hot and gooey inside. The smell of toasted bread mixed with melted cheese is another great hint.
Give it a gentle press; if it feels warm and the cheese stretches slightly, you’re good to go. Once done, think about how to plate cheese sandwiches attractively. Use a clean plate, maybe add a few fresh herbs or a side salad to brighten things up.
If you have leftovers, wrap them tightly in foil or store in an airtight container to keep that cheesy goodness fresh for later. Now, your sandwich is ready to enjoy or save without losing its charm!
Preventing Cheese Sandwich Messes and Drips
To keep your toaster cheese sandwich neat, you’ve got to control how much the cheese melts and choose the right bread thickness. Too much cheese or super thin bread can lead to drips and messy cleanups.
Let’s look at how to balance these to keep your sandwich tasty and tidy.
Controlling Cheese Melt
How exactly do you keep your cheese sandwich from turning into a gooey, sticky mess while it toasts? The secret lies in controlling how the cheese melts and interacts with your chosen bread type.
Start by picking a cheese texture that melts evenly. Semi-hard cheeses like cheddar or gouda are perfect. Avoid super soft cheeses that ooze too much.
Next, here’s how to keep things neat:
- Use a cheese thickness that melts just right without dripping.
- Choose bread with a sturdy crust to hold everything inside.
- Layer cheese in the center, away from the edges.
- Press the sandwich lightly before toasting to compact the filling.
These tips help you enjoy melty, delicious sandwiches without that annoying mess.
Using Proper Bread Thickness
A slice of bread might seem simple, but picking the right thickness can make or break your cheese sandwich experience. If the bread’s too thin, you’ll end up with soggy, drippy messes as the cheese blend melts and oozes out.
Too thick, and your toaster struggles to heat evenly, leaving you with uneven melt and a crusty bite. Aim for a medium thickness, just enough to hold the cheese blend without overpowering it. This balance stops those frustrating drips and keeps your sandwich intact.
Plus, a proper bread thickness ensures your cheese melts perfectly, giving you that gooey, satisfying pull with every bite. So, next time, don’t just grab any loaf. Choose wisely for a cleaner, tastier cheese sandwich.
Quick Fixes If Your Cheese Sandwich Isn’t Melting Right
Why isn’t your cheese sandwich melting just right? Don’t worry; it happens! Here are some quick fixes to get that perfect cheese melt you crave:
Adjust your toaster’s heat: Sometimes low heat just won’t cut it. Crank it up a notch for a gooey finish.
Use thinner slices of bread: Thick bread can block heat, preventing cheese from melting evenly.
Add a tiny splash of moisture: A few drops of water on the bread’s surface can help steam the cheese inside.
Cover with foil: Wrapping your sandwich loosely in foil traps heat, melting your cheese faster without burning bread.
Try these simple tweaks, and your toaster-made cheese sandwich will ooze cheesy goodness every time!
Creative Cheese and Bread Combinations to Try
Once you’ve nailed the perfect melt, it’s time to get creative with your cheese and bread pairings. Don’t just stick to classic white bread and cheddar. Mix things up! Try a sharp Swiss with rye for a tangy twist or creamy brie on a crusty baguette to balance crust thickness with gooey softness.
You can even experiment with sourdough’s chewy texture paired with smoky gouda for a smoky, rich bite. Remember, crust thickness matters; thicker crusts hold up better to strong cheeses, while thinner crusts let milder flavors shine.
For a fun combo, spread a thin layer of pesto on multi-grain bread and top with mozzarella—simple but packed with flavor. These creative pairings will turn your basic cheese sandwich into a gourmet treat!
Safe Practices for Toaster Cheese Sandwiches
Handle your toaster cheese sandwich with care to avoid messes and mishaps. Safe handling is key to enjoy your cheesy treat without any kitchen disasters. Follow these quick tips for toaster safety and a perfect sandwich every time:
- Use bread slices that fit your toaster slots to prevent cheese from oozing out and causing fires.
- Always clean crumbs and melted cheese from your toaster to avoid smoke or sparks.
- Never insert metal utensils to retrieve a stuck sandwich; unplug first to stay safe.
- Keep an eye on the sandwich while toasting; don’t leave it unattended to prevent burning.
Frequently Asked Questions
Can I Use Gluten-Free Bread for a Toaster Cheese Sandwich?
You can definitely use gluten-free bread for your toaster cheese sandwich! Just watch toaster safety. Gluten-free bread’s usually thinner and might burn faster, so keep an eye on it to avoid any toasty mishaps or smoke alarms going off.
What Type of Cheese Melts Best in a Toaster?
Ready for melty magic? You’ll love mozzarella or cheddar, they’re champions at cheese melting. Just keep toaster safety in mind: avoid thick slices and watch closely, so your sandwich melts perfectly without turning into a smoky mess!
How Do I Clean Melted Cheese off My Toaster?
You’ll want to unplug your toaster first, then gently scrape off dried cheese with a plastic spatula.
Wipe with a damp cloth soaked in warm soapy water to finish cleaning cheese and keep your toaster maintenance easy and safe.
Can I Add Vegetables to My Toaster Cheese Sandwich?
You can totally add veggies! Just place thin slices between the cheese layers for even vegetable placement.
Try veggie variations like tomatoes, spinach, or bell peppers, but avoid watery ones to keep your sandwich from getting soggy or messy.
Is It Safe to Use a Toaster Oven Instead of a Regular Toaster?
You can totally use a toaster oven instead of a regular toaster. 72% of people find toaster oven safety easier to manage.
Toaster oven vs. toaster, the oven’s way more versatile and safer for melting cheese evenly!
Conclusion
Now you’re ready to conquer the toaster cheese sandwich like a kitchen wizard! Imagine golden, melty cheese oozing out in glorious rivers, crusts crispier than a fresh autumn leaf, and that warm, buttery scent filling your whole house. It’s practically a masterpiece in every bite!
Just keep an eye on it—this sandwich cooks faster than a flash—and you’ll be biting into pure, gooey heaven in no time. Get ready to impress your taste buds with the ultimate toaster cheese sandwich experience!